• Sign Up! To view all forums and unlock additional cool features

    Welcome to the #1 Explorer ST Forum and Explorer ST community dedicated to Explorer ST owners and enthusiasts. Register for an account, it's free and it's easy, so don't hesitate to join the Explorer ST Forum today!


Dashcam install (heavy pics)

GTP

Member
Messages
82
Reactions
73
Points
17
Location
Indy
#1
Here is my procedure to install the Viofo A129 Duo front/rear dashcam. My Mustang also has this same exact setup, so I already knew for a year that I was satisfied with its performance, features, and reliability.
20200812_155831.jpg
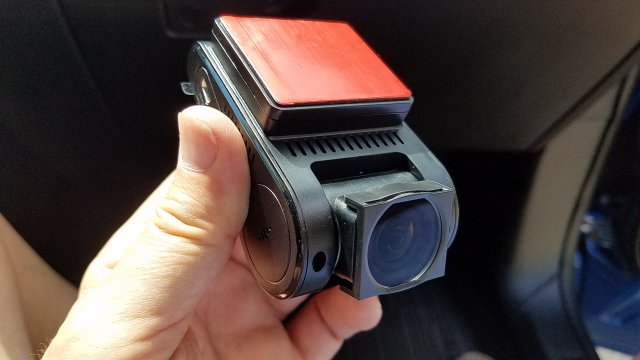
The Viofo has a great Parking Mode in my opinion. There are several options just for parking mode. It automatically switches into and out of parking mode with a couple of chirps to announce the change. I run 5 or 10 fps during parking mode, and I just verified that it recorded 15 hours of video between two car starts without ever switching off due to low (car) battery voltage. The photo above shows the available Polaroid filter snapped onto the lens. It really helps improve the image. The camera is available in 4k resolution, but I've found the 1080p version to be sufficient for my needs.

The Viofo HK3 hardwire kit is a must for this camera. It is a 3-wire harness with low voltage monitoring.

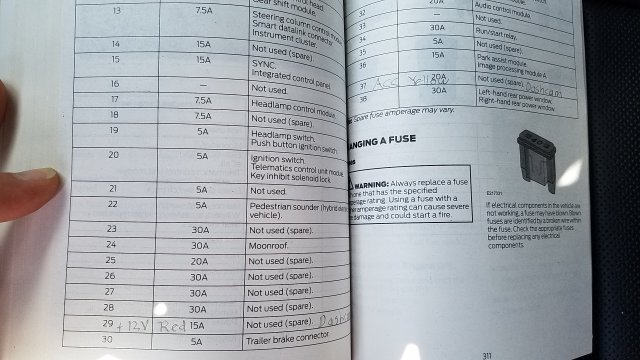
The first challenge was to identify the best fuse # choices in the fusebox. I used the owner manual together with probing the fuses to identify always-on and ignition-switched-on fuses.
Manual_90.jpg

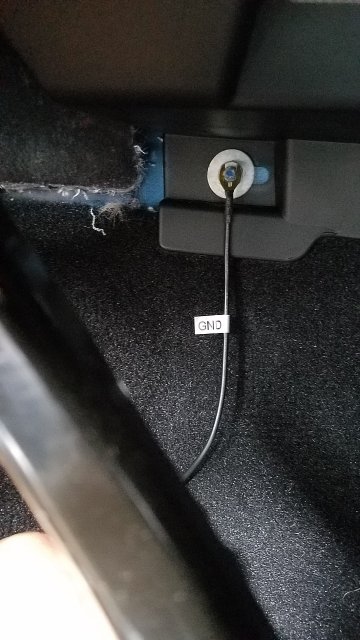
I also needed to identify a good ground source. One stud above the pedals seemed good at first, but I did not get a bright light with my tester. Do not use this stud pictured below!
Stud_90.jpg
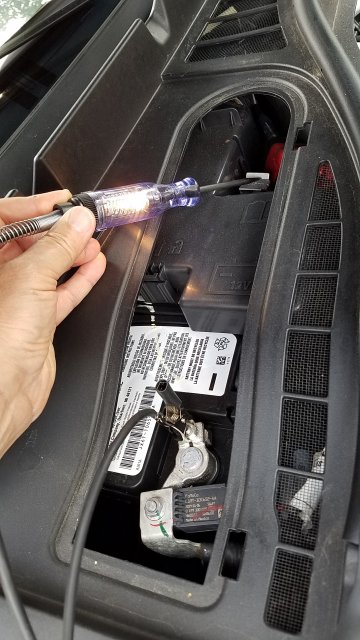
For a stupid check, I connected my tester across the battery and saw a bright light. This tester came with an dashcam install kit which also included fuse taps, plastic install levers, etc, for about $12. Tester_90.jpg
So I switched over to a larger stud and that one gave a bright light.
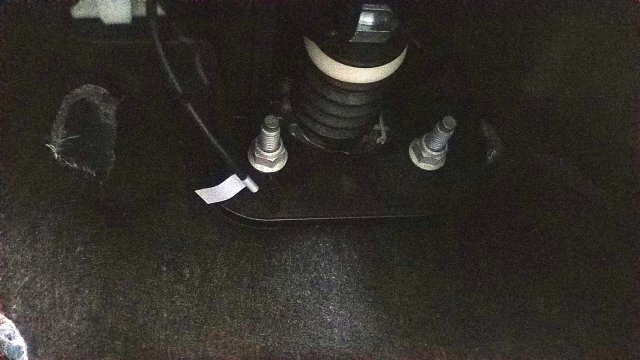
Larger_stud.jpg

I installed my two fuse taps to fuse# 37 (Accessory) and fuse# 29 (Always On). Both of these are spare fuses (unassigned)! The fuse tap leads should go off to the right, because the hot side of the fuse box is on the left and the load side is on the right of each fuse socket. I also used the same fuses that were in those sockets. I did not use extra, smaller fuses. Not technically the best method, but I'm not worried.
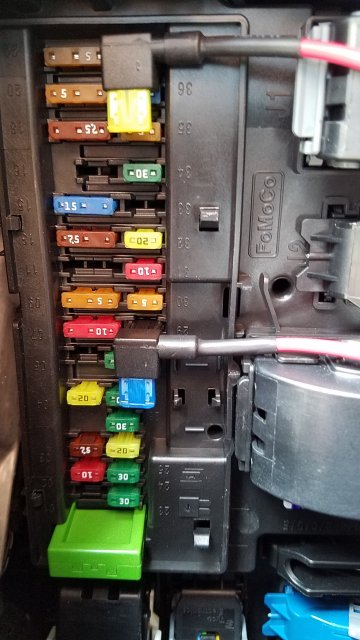
Fusetaps_90.jpg

Next I hooked everything up for a test. This was to verify that the red wire truly should go to +12V always-on, and the yellow wire is for switched-on.
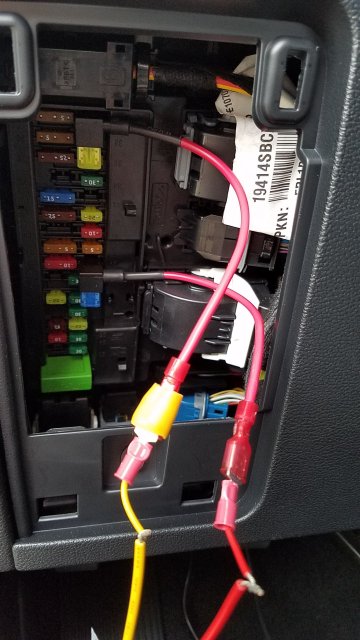
Fusetaps_red-yellow.jpg

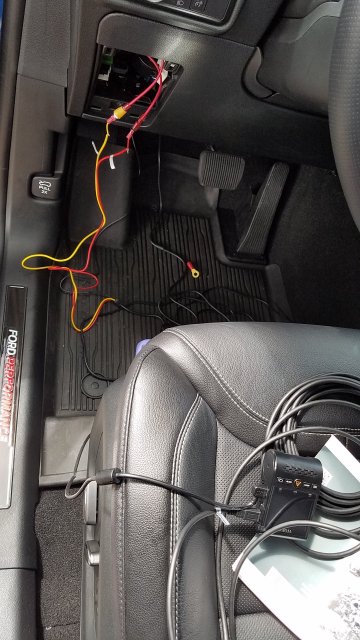
The camera turned on and started recording when I started the car. And I could tell it switched to parking mode when I turned off the car and opened the door. (The fast-ons with stripped ends were leftovers from a previous install. I got lazy and used small wire nuts instead of crimping fresh fast-ons onto the harness leads. The gold ring terminal in the next photo fit the larger ground stud, but the wire opening is ridiculously large so I simply spread the prongs of the factory lug to fit.)
Checkout.jpg

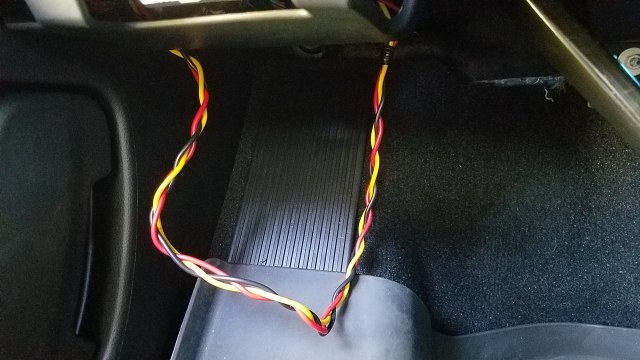
Braided the HK3 red-yellow-black wires, just because.
20200818_181132.jpg

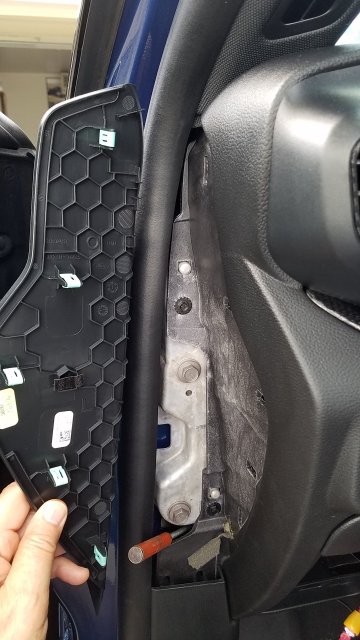
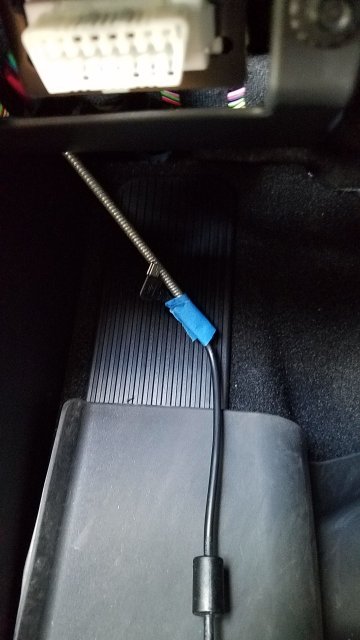
Then I was ready to run the cable for the front camera. I pulled the cover off the side of the dash. This cover removed easily, because the plastic clips don't grip as hard as Ford's metal clips. I taped the cable to a stick to pull it through the dash. It is the red cylinder in this photo.
Side_cover.jpg

Taped_cable.jpg

I then ran the cable behind the A pillar using the supplied plastic tool. Not too hard this part. Then across and behind the headliner above the driver's position.
Apillar.jpg

I did not pull down on the center housing at the top of the windshield. I already knew that could spell trouble. Instead I used another trim tool to push the cable into the gap between the housing and the headliner. This tool was a bit more blunt so as not to damage the cable. Yes, you can push it up in there.
Center_housing_2.jpg

I mounted the dashcam just to the right of the center housing and below the perimeter blackout. I verified that the windshield wiper will reach up that high. I stuck the camera down with the supplied VHB tape after carefully aligning it to be vertical and level. You only get one chance for this step, so you may want to use blue tape on the windshield to define your target beforehand.
20200812_161442.jpg

There was a nifty location to stick the voltage monitor behind the fusebox cover using double-stick foam tape. It reads upside down, but that was necessary to have access to the voltage switch. Voltage_monitor.jpg

Here is a photo of the world's thickest USB cable. It was troublesome to run it from rear to front. And it took me a couple of hours because I had to figure things out and proceed slow and careful.
Thickest_cable.jpg

Yes, I did run the cable through the rubber bellows at the liftgate. There really weren't any better options. I had to use an official electrician's fishtape in order to succeed, and I had to pull the entire length of the 19-foot cable through this tube forwards because the right-angle USB connector just wouldn't want to pull through there. Besides, I wanted the angled connector at the rear camera, and the straight connector at the front camera. This was opposite to the factory labels. 20200813_083629.jpg

The photo shows that I pulled the rubber boot off the white plastic flange. One of the flanges popped out easily, but the other fought me with a death grip. The photo shows that the white flange has 4 different grips, so now you know where you can put pressure with your trim tool. 20200813_083659.jpg

It was tricky routing the cable up to the front in spots. I used the fishtape for the large span around the D pillar under the headliner.

The B pillar had the challenge in that the plastic trim over the seat belt had plastic stiffening ribs at its upper edge that prevented simply stuffing the cable down and behind the trim. So instead I routed the cable straight down a few inches at the rear edge of the trim, and then looped it back up the front edge of the trim. This was a way to get around those ribs. I made sure that it would not snag with the seatbelt behind the trim. Then I continued on to the A pillar, and then across the passenger side headliner to the camera. I had reached my destination!
Bpillar.jpg

Yes, there are airbags to be avoided. I just kept the cables at the outer perimeter of the headliner and all was good.
 

Last edited:
OP
GTP

GTP

Member
Messages
82
Reactions
73
Points
17
Location
Indy
Thread Starter #2
I will be rotating the photos for a better read. Be patient...

Update: Photos rotated, and more added to the text. I will add a couple more photos soon.
 

Last edited:

zdubyadubya

Active Member
Messages
813
Reactions
636
Points
232
Location
Utah
Vehicle
2020 ST
#3
this is fantastic. thank you.
 

Messages
244
Reactions
111
Points
37
Location
Tucson, AZ
#4
Thank you sir! Really an excellent write up.
 

OP
GTP

GTP

Member
Messages
82
Reactions
73
Points
17
Location
Indy
Thread Starter #5
You're welcome. It was a time-consuming install (don't ask), plus the photos and write-up. But I know my time will save you time.

BTW, I added photos of the larger ground stud, and braided HK3 wires.
 

kimmonia

New Member
Messages
18
Reactions
8
Points
2
Location
Midwest
#6
Thank you! Can't wait to do this to mine. Also, be sure to look at where the airbags deploy and avoid running your cables that could potentially impede proper function. in my 2018, I ended up running along the floor boards to get to the back so I wouldn't be near the side curtains.
 

Blackssr

Active Member
Messages
646
Reactions
346
Points
182
Location
Florida
#7
Here is my procedure to install the Viofo A129 Duo front/rear dashcam. My Mustang also has this same exact setup, so I already knew for a year that I was satisfied with its performance, features, and reliability.
View attachment 1736
The Viofo has a great Parking Mode in my opinion. There are several options just for parking mode. It automatically switches into and out of parking mode with a couple of chirps to announce the change. I run 5 or 10 fps during parking mode, and I just verified that it recorded 15 hours of video between two car starts without ever switching off due to low (car) battery voltage. The photo above shows the available Polaroid lens snapped onto the lens. It really helps improve the image. The camera is available in 4k resolution, but I've found the 1080p version to be sufficient for my needs.

The Viofo HK3 hardwire kit is a must for this camera. It is a 3-wire harness with low voltage monitoring.

The first challenge was to identify the best fuse # choices in the fusebox. I used the owner manual together with probing the fuses to identify always-on and ignition-switched-on fuses.
View attachment 1749

I also needed to identify a good ground source. One stud above the pedals seemed good at first, but I did not get a bright light with my tester. Do not use this stud pictured below!
View attachment 1746
For a stupid check, I connected my tester across the battery and saw a bright light. View attachment 1747

So I switched over to a larger stud and that one gave a bright light.
View attachment 1764

I installed my two fuse taps to fuse# 37 (Accessory) and fuse# 29 (Always On). Both of these are spare fuses (unassigned)! The fuse tap leads should go off to the right, because the hot side of the fuse box is on the left and the load side is on the right of each fuse socket. I also used the same fuses that were in those sockets. I did not use extra, smaller fuses. Not technically the best method, but I'm not worried.
View attachment 1750

Next I hooked everything up for a test. This was to verify that the red wire truly should go to +12V always-on, and the yellow wire is for switched-on.
View attachment 1748

The camera turned on and started recording when I started the car. And I could tell it switched to parking mode when I turned off the car and opened the door. (The fast-ons with stripped ends were leftovers from a previous install. I got lazy and used small wire nuts instead of crimping fresh fast-ons onto the harness leads. The gold ring terminal in the next photo fit the larger ground stud, but the wire opening is ridiculously large so I simply spread the prongs of the factory lug to fit.)
View attachment 1751

Braided the HK3 red-yellow-black wires, just because.
View attachment 1765

Then I was ready to run the cable for the front camera. I pulled the cover off the side of the dash. This cover removed easily, because the plastic clips don't grip as hard as Ford's metal clips. I taped the cable to a stick to pull it through the dash. It is the red cylinder in this photo.
View attachment 1752

View attachment 1753

I then ran the cable behind the A pillar using the supplied plastic tool. Not too hard this part. Then across and behind the headliner above the driver's position.
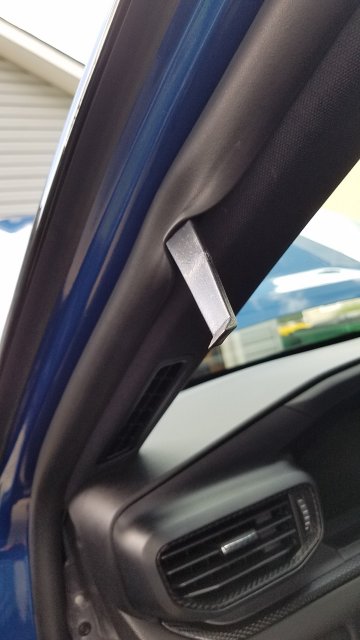
View attachment 1754

I did not pull down on the center housing at the top of the windshield. I already knew that could spell trouble. Instead I used another trim tool to push the cable into the gap between the housing and the headliner. This tool was a bit more blunt so as not to damage the cable. Yes, you can push it up in there.
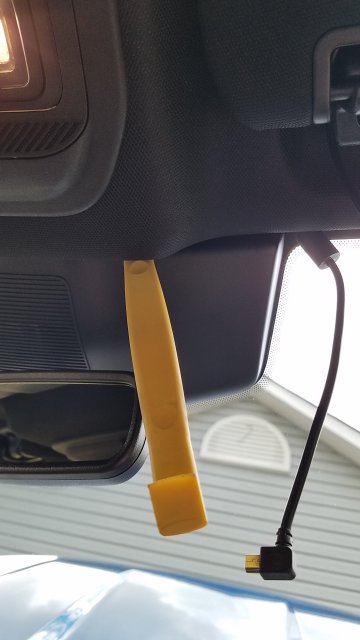
View attachment 1755

I mounted the dashcam just to the right of the center housing and below the perimeter blackout. I verified that the windshield wiper will reach up that high. I stuck the camera down with the supplied VHB tape after carefully aligning it to be vertical and level. You only get one chance for this step, so you may want to use blue tape on the windshield to define your target beforehand.
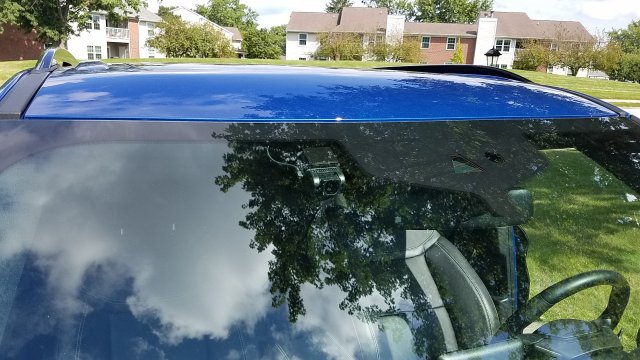
View attachment 1735

There was a nifty location to stick the voltage monitor behind the fusebox cover using double-stick foam tape. It reads upside down, but that was necessary to have access to the voltage switch. View attachment 1756
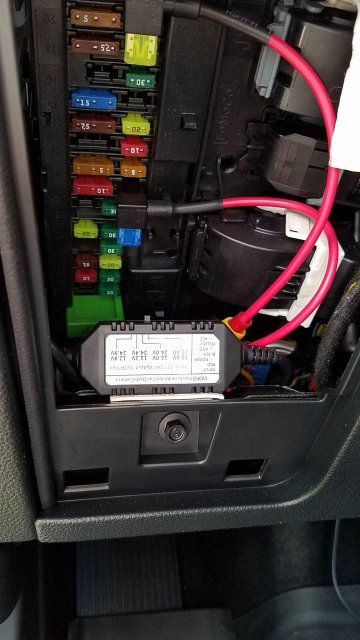
Here is a photo of the world's thickest USB cable. It was troublesome to run it from rear to front. And it took me a couple of hours because I had to figure things out and proceed slow and careful.
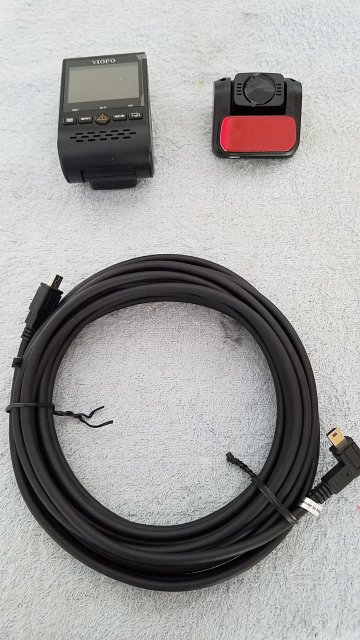
View attachment 1757

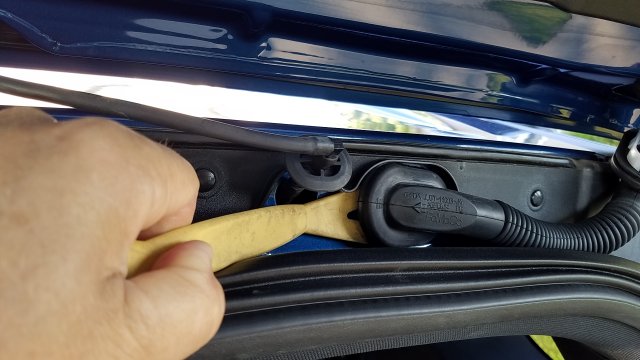
Yes, I did run the cable through the rubber bellows at the liftgate. There really weren't any better options. I had to use an official electrician's fishtape in order to succeed, and I had to pull the entire length of the 19-foot cable through this tube forwards because the right-angle USB connector just wouldn't want to pull through there. Besides, I wanted the angled connector at the rear camera, and the straight connector at the front camera. This was opposite to the factory labels. View attachment 1739
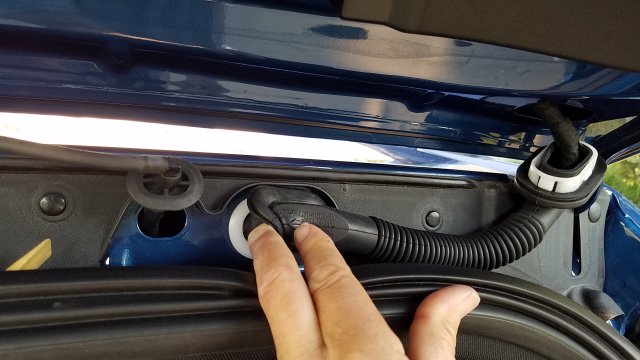
The photo shows that I pulled the rubber boot off the white plastic flange. One of the flanges popped out easily, but the other fought me with a death grip. The photo shows that the white flange has 4 different grips, so now you know where you can put pressure with your trim tool. View attachment 1740
It was tricky routing the cable up to the front in spots. I used the fishtape for the large span around the D pillar under the headliner.

The B pillar had the challenge in that the plastic trim over the seat belt had plastic stiffening ribs at its upper edge that prevented simply stuffing the cable down and behind the trim. So instead I routed the cable straight down a few inches at the rear edge of the trim, and then looped it back up the front edge of the trim. This was a way to get around those ribs. I made sure that it would not snag with the seatbelt behind the trim. Then I continued on to the A pillar, and then across the passenger side headliner to the camera. I had reached my destination!
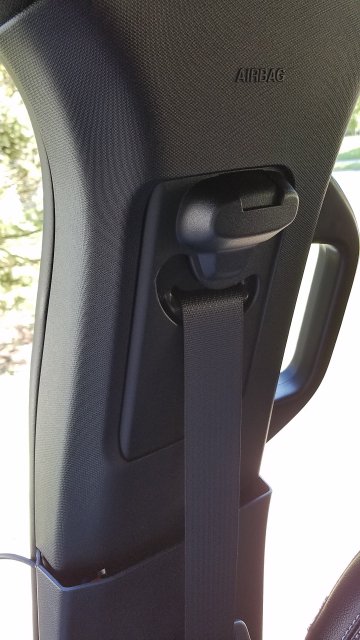
View attachment 1759

Yes, there are airbags to be avoided. I just kept the cables at the outer perimeter of the headliner and all was good.
Why would someone need this? Why do you feel the need to record all the time
 

zdubyadubya

Active Member
Messages
813
Reactions
636
Points
232
Location
Utah
Vehicle
2020 ST
#8
Why would someone need this? Why do you feel the need to record all the time
Its not for having a recording all the time, its for having a recording on hand when you might need it. I've used mine twice. Once to get out of a red light ticket (i was able to show the officer the light was still yellow) and once to show that even though i rear-ended another driver--they were actually at fault. The second instance saved me enough money that my cam has paid for itself a few times over. I also get a pretty big insurance discount for having one.

That being said, I also commute into DC every day. I see soooo much stuff that defies belief, its fun having recordings to show people.
 

Taz

Member
Messages
54
Reactions
24
Points
7
Location
Somerset, NJ, USA
#9
Here is my procedure to install the Viofo A129 Duo front/rear dashcam. My Mustang also has this same exact setup, so I already knew for a year that I was satisfied with its performance, features, and reliability.
View attachment 1736
The Viofo has a great Parking Mode in my opinion. There are several options just for parking mode. It automatically switches into and out of parking mode with a couple of chirps to announce the change. I run 5 or 10 fps during parking mode, and I just verified that it recorded 15 hours of video between two car starts without ever switching off due to low (car) battery voltage. The photo above shows the available Polaroid lens snapped onto the lens. It really helps improve the image. The camera is available in 4k resolution, but I've found the 1080p version to be sufficient for my needs.

The Viofo HK3 hardwire kit is a must for this camera. It is a 3-wire harness with low voltage monitoring.

The first challenge was to identify the best fuse # choices in the fusebox. I used the owner manual together with probing the fuses to identify always-on and ignition-switched-on fuses.
View attachment 1749

I also needed to identify a good ground source. One stud above the pedals seemed good at first, but I did not get a bright light with my tester. Do not use this stud pictured below!
View attachment 1746
For a stupid check, I connected my tester across the battery and saw a bright light. View attachment 1747

So I switched over to a larger stud and that one gave a bright light.
View attachment 1764

I installed my two fuse taps to fuse# 37 (Accessory) and fuse# 29 (Always On). Both of these are spare fuses (unassigned)! The fuse tap leads should go off to the right, because the hot side of the fuse box is on the left and the load side is on the right of each fuse socket. I also used the same fuses that were in those sockets. I did not use extra, smaller fuses. Not technically the best method, but I'm not worried.
View attachment 1750

Next I hooked everything up for a test. This was to verify that the red wire truly should go to +12V always-on, and the yellow wire is for switched-on.
View attachment 1748

The camera turned on and started recording when I started the car. And I could tell it switched to parking mode when I turned off the car and opened the door. (The fast-ons with stripped ends were leftovers from a previous install. I got lazy and used small wire nuts instead of crimping fresh fast-ons onto the harness leads. The gold ring terminal in the next photo fit the larger ground stud, but the wire opening is ridiculously large so I simply spread the prongs of the factory lug to fit.)
View attachment 1751

Braided the HK3 red-yellow-black wires, just because.
View attachment 1765

Then I was ready to run the cable for the front camera. I pulled the cover off the side of the dash. This cover removed easily, because the plastic clips don't grip as hard as Ford's metal clips. I taped the cable to a stick to pull it through the dash. It is the red cylinder in this photo.
View attachment 1752

View attachment 1753

I then ran the cable behind the A pillar using the supplied plastic tool. Not too hard this part. Then across and behind the headliner above the driver's position.
View attachment 1754

I did not pull down on the center housing at the top of the windshield. I already knew that could spell trouble. Instead I used another trim tool to push the cable into the gap between the housing and the headliner. This tool was a bit more blunt so as not to damage the cable. Yes, you can push it up in there.
View attachment 1755

I mounted the dashcam just to the right of the center housing and below the perimeter blackout. I verified that the windshield wiper will reach up that high. I stuck the camera down with the supplied VHB tape after carefully aligning it to be vertical and level. You only get one chance for this step, so you may want to use blue tape on the windshield to define your target beforehand.
View attachment 1735

There was a nifty location to stick the voltage monitor behind the fusebox cover using double-stick foam tape. It reads upside down, but that was necessary to have access to the voltage switch. View attachment 1756

Here is a photo of the world's thickest USB cable. It was troublesome to run it from rear to front. And it took me a couple of hours because I had to figure things out and proceed slow and careful.
View attachment 1757

Yes, I did run the cable through the rubber bellows at the liftgate. There really weren't any better options. I had to use an official electrician's fishtape in order to succeed, and I had to pull the entire length of the 19-foot cable through this tube forwards because the right-angle USB connector just wouldn't want to pull through there. Besides, I wanted the angled connector at the rear camera, and the straight connector at the front camera. This was opposite to the factory labels. View attachment 1739

The photo shows that I pulled the rubber boot off the white plastic flange. One of the flanges popped out easily, but the other fought me with a death grip. The photo shows that the white flange has 4 different grips, so now you know where you can put pressure with your trim tool. View attachment 1740

It was tricky routing the cable up to the front in spots. I used the fishtape for the large span around the D pillar under the headliner.

The B pillar had the challenge in that the plastic trim over the seat belt had plastic stiffening ribs at its upper edge that prevented simply stuffing the cable down and behind the trim. So instead I routed the cable straight down a few inches at the rear edge of the trim, and then looped it back up the front edge of the trim. This was a way to get around those ribs. I made sure that it would not snag with the seatbelt behind the trim. Then I continued on to the A pillar, and then across the passenger side headliner to the camera. I had reached my destination!
View attachment 1759

Yes, there are airbags to be avoided. I just kept the cables at the outer perimeter of the headliner and all was good.
Thanks for this write up. I installed a dash cam this weekend and your guide helped me a lot. I had a question on the 3-wire connection and your info set me up. Everything came out perfect and you can't see the camera or the wire from inside. No issues with battery run down either.

Jim
 

Messages
388
Reactions
338
Points
67
Location
Calgary, AB, Canada
#10
Thanks for the write up, I have a Blakevue to install this weekend. Looks like it’s gonna be fun.


Sent from my iPhone using Tapatalk
 

iexplore

New Member
Messages
4
Reactions
3
Points
2
Location
Atlanta, GA, USA
#11
Here is my procedure to install the Viofo A129 Duo front/rear dashcam. My Mustang also has this same exact setup, so I already knew for a year that I was satisfied with its performance, features, and reliability.
Thanks for the great instructions!

I was leaning toward paying an installer but after seeing their quote and having to wait several weeks for the next available slot, I decided to research other options. I have had dashcams in previous vehicles but never installed one myself. After seeing your post, I decided to do it myself and did not not take long at all as I only installed a Viofo A129 Pro front camera.
 

hotrodruby

New Member
U.S. Air Force Veteran
Messages
2
Reactions
0
Points
1
Location
Louisville, KY, USA
#12
Great write up! Only one question for you... That side panel you took off, mine says there's an airbag behind it, is yours the same? I tried to pull it off, gently, but it wouldn't budge so I was a little scared to try harder. If yours also had an air bag then I'll feel much more comfortable pulling it off.

Thanks!
 

OP
GTP

GTP

Member
Messages
82
Reactions
73
Points
17
Location
Indy
Thread Starter #13
Great write up! Only one question for you... That side panel you took off, mine says there's an airbag behind it, is yours the same? I tried to pull it off, gently, but it wouldn't budge so I was a little scared to try harder. If yours also had an air bag then I'll feel much more comfortable pulling it off.

Thanks!
If you are referring to the small panel at the driver's end of the dash (tenth photo), then there is no airbag behind the cover itself.

Perhaps you are referring to the passenger side panel behind the seatbelt (last photo). Study that photo to see that only the lower plastic cover is popped out slightly. The upper textured panel (with "Airbag" label) is left undisturbed.

The write-up indicates that the USB cable is first routed down along the rear edge of these two panels. There are stiffening ribs at the upper end of the lower panel and those are what prevent the cable from simply being tucked under the panel without removing it. So pull the upper end of the lower panel out enough to route the cable under those ribs, and across from rear to front edge, and then you can proceed back up and under the front edge of the textured panel.


The "AIRBAG" label is at the upper end of the textured panel. I suspect that it indicates that there are airbags beside and above the front and middle seat passengers, i.e. at the roof behind the headliner. It would not be possible to mold this label into the headliner. It is possible that there is a vertical airbag behind the upper cover, but that doesn't make sense because it would just expand into side of the front seat.

Hope this makes sense.
 

Messages
63
Reactions
22
Points
7
Location
Lincoln, CA, USA
Vehicle
2021 Explorer ST
#14
Could you have just tapped a wire pair in the upper console?
 

st8

1000 Post Club
Messages
1,074
Reactions
479
Points
212
Location
Bel Air, MD, USA
#16
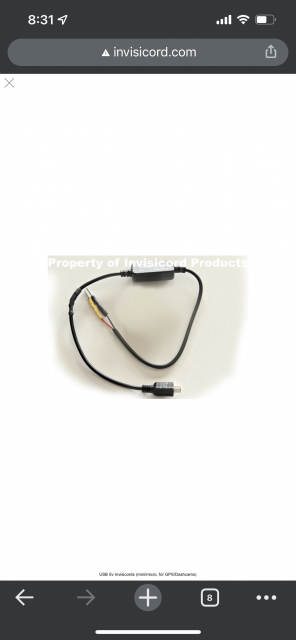
Hi all, finally got my ST. I have a garmin dash cam that I used in my 17 explorer. I used an invisicord to tap into a wire harness behind the rear view mirror. Worked great. Powered on with car, and off with car.
Not sure if that is still an option with the new explorers. They have a lot going on in the top of the windshield with the cameras, sensors, etc.

So I’m looking to just do the fuse tap. I couldn’t quite tell from the picture, but what did you use to connect the power cable of the dash cam to the tap a fuses?
I posted a picture of the invisicord I’m familiar with. Does each of those metal tabs just go into the the tap a fuse piece?
 

Attachments

Sgt1411

Member
Law Enforcement
Messages
239
Reactions
151
Points
37
Location
BC&AZ
Vehicle
2021 ST
#17
Great write up I did almost exact same install.

For anyone looking at a F/R camera consider Thinkware Q800PRO.

The entire Thinkware line up is good.
 

Cdubya

1000 Post Club
Messages
1,697
Reactions
846
Points
262
Location
NE Ohio
Vehicle
2020 Explorer ST
#18
Great write up I did almost exact same install.

For anyone looking at a F/R camera consider Thinkware Q800PRO.

The entire Thinkware line up is good.
I would agree. Only downside is their proprietary power cable. Mine developed a break and needed replacement. Not cheap.
 

OP
GTP

GTP

Member
Messages
82
Reactions
73
Points
17
Location
Indy
Thread Starter #19
Hi all, finally got my ST. I have a garmin dash cam that I used in my 17 explorer. I used an invisicord to tap into a wire harness behind the rear view mirror. Worked great. Powered on with car, and off with car.
Not sure if that is still an option with the new explorers. They have a lot going on in the top of the windshield with the cameras, sensors, etc.

So I’m looking to just do the fuse tap. I couldn’t quite tell from the picture, but what did you use to connect the power cable of the dash cam to the tap a fuses?
I posted a picture of the invisicord I’m familiar with. Does each of those metal tabs just go into the the tap a fuse piece?
Your power wire looks like it has already been spliced, and at both ends.
You will need to do some splicing again. The black wire needs to go under a chassis ground screw, and the red wire must attach to fuse #37 via tap-a-fuse.
You will need to get some 2-conductor wire to lengthen your power harness. 18 gauge should be about right.
Note that your camera will not run while parked. For that you could buy the Viofo HK3 power harness (around $20), and then wire according to my original post. Be forewarned that this harness has the camera style USB connector, and may not match what your camera requires.
 

Sgt1411

Member
Law Enforcement
Messages
239
Reactions
151
Points
37
Location
BC&AZ
Vehicle
2021 ST
#20
I would agree. Only downside is their proprietary power cable. Mine developed a break and needed replacement. Not cheap.
Thinkware uses micro USB on my Q800Pro

I bought their OBDII power tap so no need to buy fuse taps, very clean easy to pull out if vehicle sold.


Top