• Sign Up! To view all forums and unlock additional cool features

    Welcome to the #1 Explorer ST Forum and Explorer ST community dedicated to Explorer ST owners and enthusiasts. Register for an account, it's free and it's easy, so don't hesitate to join the Explorer ST Forum today!


H&R install and first impressions

Messages
50
Reactions
26
Points
17
Location
Westfield, NJ
Vehicle
2024 Explorer ST
#1
This topic has probably been discussed many times over but I would like to add a few details that I discovered during install.
1. Rear springs:
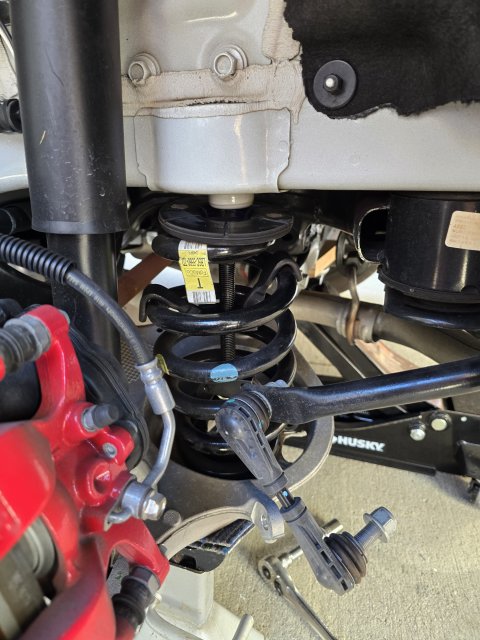
I only had to take 1 bolt off to remove and install rear springs - sway bar link bolt. I used the jack to compress rear spring and then inserted inside coil spring compressor, once I lowered the jack spring simply came out. To install the replacement, I compressed it first, popped it in, jacked it up and removed the compressor. You don't even have to take the wheels off if you have a lift.
Total time for both rear sides: 45 min.
2. Front springs:
I installed over 100 H&R springs on various vehicles and never seen them being installed upside down unless they call it for it (Supra). I went ahead and emailed their service dept and got a confirmation that lettering has to be upright, top of the spring has to sit flush and not the bottom. I confirmed it with the stock spring and it also tilts to 1 side.
Total time for both front sides: 2 hrs and 2 beers

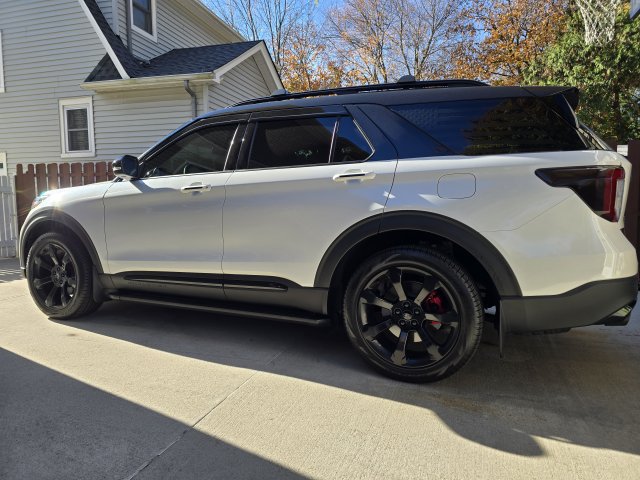
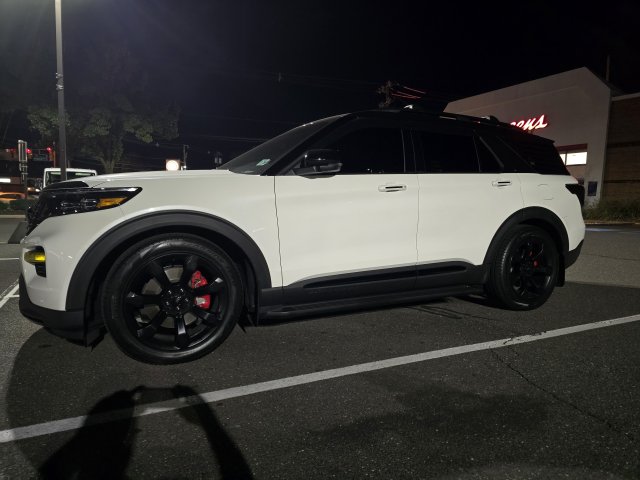
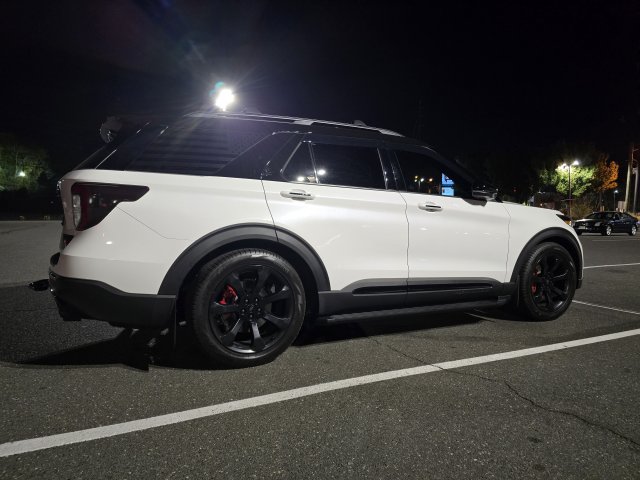
Car dropped about 1" in the front and 1.25" in the back right after install. After 50mi drive they settled in around 1.25F/1.6R. Will update after 1000mi.
Ride is significantly better, more planted to the road. Not harsher at all comparing to stock. It absorbs small road imperfection way more predictably.
- internal spring compressor
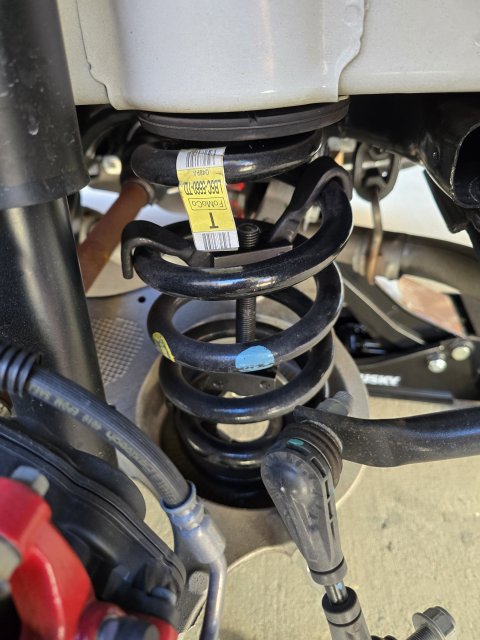
1000009167.jpg
- spring pops right out 1000009168.jpg
- stock vs hr front springs comparison
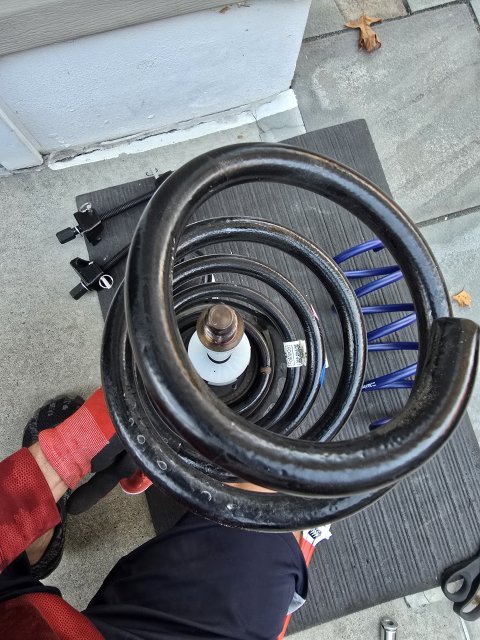
1000009175.jpg 1000009176.jpg
- stock ride height
1000009163.jpg
- hr after 50 miles
1000009179.jpg
1000009178.jpg
 

DarkgrayST

New Member
Messages
3
Reactions
3
Points
2
Location
Austin Tx
Vehicle
2022 Explorer ST
#2
Great info!
 

Messages
291
Reactions
178
Points
37
Location
Sacramento, CA, USA
Vehicle
2021 Explorer ST Carbonized Gray
#3
This topic has probably been discussed many times over but I would like to add a few details that I discovered during install.
1. Rear springs:
I only had to take 1 bolt off to remove and install rear springs - sway bar link bolt. I used the jack to compress rear spring and then inserted inside coil spring compressor, once I lowered the jack spring simply came out. To install the replacement, I compressed it first, popped it in, jacked it up and removed the compressor. You don't even have to take the wheels off if you have a lift.
Total time for both rear sides: 45 min.
2. Front springs:
I installed over 100 H&R springs on various vehicles and never seen them being installed upside down unless they call it for it (Supra). I went ahead and emailed their service dept and got a confirmation that lettering has to be upright, top of the spring has to sit flush and not the bottom. I confirmed it with the stock spring and it also tilts to 1 side.
Total time for both front sides: 2 hrs and 2 beers

Car dropped about 1" in the front and 1.25" in the back right after install. After 50mi drive they settled in around 1.25F/1.6R. Will update after 1000mi.
Ride is significantly better, more planted to the road. Not harsher at all comparing to stock. It absorbs small road imperfection way more predictably.
- internal spring compressor
View attachment 26069
- spring pops right out View attachment 26070
- stock vs hr front springs comparison
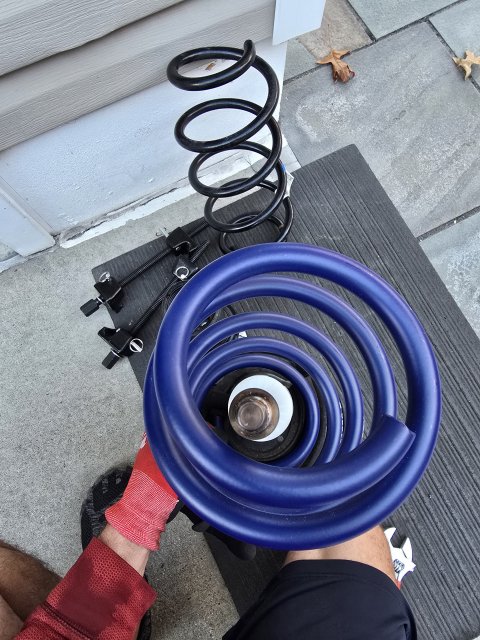
View attachment 26071 View attachment 26072
- stock ride height
View attachment 26073
- hr after 50 miles
View attachment 26074
View attachment 26075
Nice write up, I will have to get an internal spring compressor if I ever switch out my H&R's. You're ST looks good!
 

2020FordRaptor

1000 Post Club
Messages
1,463
Reactions
699
Points
162
Location
Nevada
Vehicle
'20 Raptor, '22 Explorer ST, '14 GT500, '03 F150
#4
Correct me if I’m wrong, but just because lettering on a spring is upside down doesn’t mean the spring itself is installed upside down. I know a lot of people had to install the spring with it seated correctly and the spring in the correct orientation with lettering upside down. Maybe just an manufacturing mistake, after all it’s just lettering?
 

UNBROKEN

4000 Post Club
Messages
4,580
Reactions
5,355
Points
352
Location
Houston, TX, USA
#5
Correct me if I’m wrong, but just because lettering on a spring is upside down doesn’t mean the spring itself is installed upside down. I know a lot of people had to install the spring with it seated correctly and the spring in the correct orientation with lettering upside down. Maybe just a manufacturing mistake, after all it’s just lettering?
The lettering is irrelevant if the spring has different ends. Just read the rubber pad the spring sits on…match the new spring to the old indention and all will be well. The car will quite literally show you how to orient the coil.
 

2020FordRaptor

1000 Post Club
Messages
1,463
Reactions
699
Points
162
Location
Nevada
Vehicle
'20 Raptor, '22 Explorer ST, '14 GT500, '03 F150
#6
The lettering is irrelevant if the spring has different ends. Just read the rubber pad the spring sits on…match the new spring to the old indention and all will be well. The car will quite literally show you how to orient the coil.
That’s pretty much what I was thinking, just wanted to confirm.
 

Cruising68

1000 Post Club
Messages
1,620
Reactions
1,181
Points
262
Location
Chicago, IL, USA
#7
The lettering is irrelevant if the spring has different ends. Just read the rubber pad the spring sits on…match the new spring to the old indention and all will be well. The car will quite literally show you how to orient the coil.
This is what I recall when I did mine. It was obvious which way to orient the spring.


Sent from my iPad using Tapatalk
 

OP
nikolai9956
Messages
50
Reactions
26
Points
17
Location
Westfield, NJ
Vehicle
2024 Explorer ST
Thread Starter #8
Correct me if I’m wrong, but just because lettering on a spring is upside down doesn’t mean the spring itself is installed upside down. I know a lot of people had to install the spring with it seated correctly and the spring in the correct orientation with lettering upside down. Maybe just an manufacturing mistake, after all it’s just lettering?
Regardless of the lettering, when you seat the spring onto the strut assembly, it will not sit straight up and will try to tilt to one side. This is normal because top plate is what has to be flush and straight and no the bottom. Some people get confused because the spring tilts sideways. If you sit it flush and straight on the bottom, it might cause slight clanking noise when fully extended, as per H&R email.
 

SmittysST

Member
Law Enforcement
Messages
129
Reactions
25
Points
17
Location
SOCAL
Vehicle
2023 FORD Explorer ST
#9
Great write up! I like the look with the HRs and your spacers!!
 

22SporTsploder

New Member
U.S. Army Veteran
Messages
22
Reactions
5
Points
2
Location
America
Vehicle
22 Explorer ST
#10
This topic has probably been discussed many times over but I would like to add a few details that I discovered during install.
1. Rear springs:
I only had to take 1 bolt off to remove and install rear springs - sway bar link bolt. I used the jack to compress rear spring and then inserted inside coil spring compressor, once I lowered the jack spring simply came out. To install the replacement, I compressed it first, popped it in, jacked it up and removed the compressor. You don't even have to take the wheels off if you have a lift.
Total time for both rear sides: 45 min.
2. Front springs:
I installed over 100 H&R springs on various vehicles and never seen them being installed upside down unless they call it for it (Supra). I went ahead and emailed their service dept and got a confirmation that lettering has to be upright, top of the spring has to sit flush and not the bottom. I confirmed it with the stock spring and it also tilts to 1 side.
Total time for both front sides: 2 hrs and 2 beers

Car dropped about 1" in the front and 1.25" in the back right after install. After 50mi drive they settled in around 1.25F/1.6R. Will update after 1000mi.
Ride is significantly better, more planted to the road. Not harsher at all comparing to stock. It absorbs small road imperfection way more predictably.
- internal spring compressor
View attachment 26069
- spring pops right out View attachment 26070
- stock vs hr front springs comparison
View attachment 26071 View attachment 26072
- stock ride height
View attachment 26073
- hr after 50 miles
View attachment 26074
View attachment 26075
Curious to know how once you jacked up the rear wheel you were able to fit the spring compressor in the between the compressed spring? How would there be space to insert the internal spring compressor? I would think you would have to insert it from the top or bottom or the opening of the spring which looks to be inaccessible?
 

OP
nikolai9956
Messages
50
Reactions
26
Points
17
Location
Westfield, NJ
Vehicle
2024 Explorer ST
Thread Starter #11
Curious to know how once you jacked up the rear wheel you were able to fit the spring compressor in the between the compressed spring? How would there be space to insert the internal spring compressor? I would think you would have to insert it from the top or bottom or the opening of the spring which looks to be inaccessible?
Correct. I inserted the retainers while it was uncompressed. Then compressed it and inserted the bolt from the bottom.
 

22SporTsploder

New Member
U.S. Army Veteran
Messages
22
Reactions
5
Points
2
Location
America
Vehicle
22 Explorer ST
#12
Correct. I inserted the retainers while it was uncompressed. Then compressed it and inserted the bolt from the bottom.
Okay so the whole on the bottom is big enough to fit the spring compressor rod/bolt! Thanks I'm about to order the internal spring compressor from Amazon.
 

OP
nikolai9956
Messages
50
Reactions
26
Points
17
Location
Westfield, NJ
Vehicle
2024 Explorer ST
Thread Starter #13
Okay so the whole on the bottom is big enough to fit the spring compressor rod/bolt! Thanks I'm about to order the internal spring compressor from Amazon.
I used a cheap one from Amazon as well. Once you take the spring out, I recommend using better quality external compressor (the one you'll use for the front) to release the pressure off the spring. Then repeat the process with the replacement spring.


Top