• Sign Up! To view all forums and unlock additional cool features

    Welcome to the #1 Explorer ST Forum and Explorer ST community dedicated to Explorer ST owners and enthusiasts. Register for an account, it's free and it's easy, so don't hesitate to join the Explorer ST Forum today!


Torn on installing dash cam via mirror tap vs fuse

st8

1000 Post Club
Messages
1,074
Reactions
479
Points
212
Location
Bel Air, MD, USA
#1
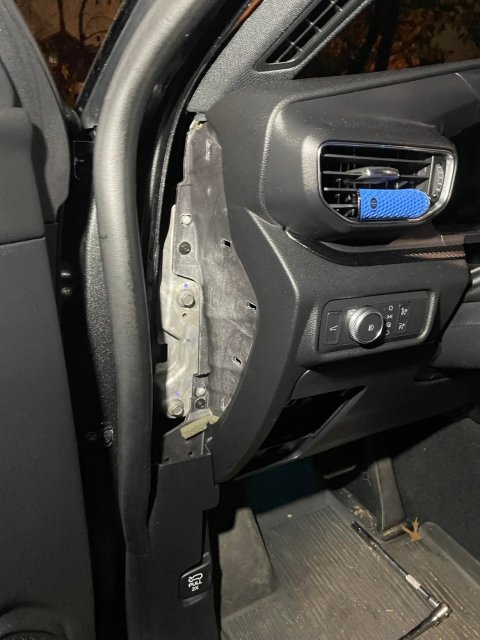
So my initial plan was to just do a mirror tap like I did on my old explorer. I did start to mess with removing the black cover piece and the one side came off relatively easily. So I think that way would be straightforward.

However, all these writes up on fuse hook up or obdii hookup with the ability to record when the car is off is tempting. Although I’m not sure my garmin can do that without some adapter from garmin.

My only concern with doing the fuse hook up is I’m bound to see some wire. I can run it behind the panel on the side of the dash that says airbag on it, then run it up the a pillar hidden by the black seal trim. But eventually it has to cross over and I’ll see that. Am I missing something? I don’t want to remove the a pillar. Thanks
 

SOUTHFLST

Member
U.S. Air Force Veteran
Messages
149
Reactions
79
Points
27
Location
South Florida
#2
Having it recording when I’m not in the car is a must for me. The A-pillar shouldn’t be difficult to remove
 

OP
S

st8

1000 Post Club
Messages
1,074
Reactions
479
Points
212
Location
Bel Air, MD, USA
Thread Starter #3
Having it recording when I’m not in the car is a must for me. The A-pillar shouldn’t be difficult to remove
It’s the airbag behind it that worries me.
 

Sgt1411

Member
Law Enforcement
Messages
239
Reactions
151
Points
37
Location
BC&AZ
Vehicle
2021 ST
#4
So my initial plan was to just do a mirror tap like I did on my old explorer. I did start to mess with removing the black cover piece and the one side came off relatively easily. So I think that way would be straightforward.

However, all these writes up on fuse hook up or obdii hookup with the ability to record when the car is off is tempting. Although I’m not sure my garmin can do that without some adapter from garmin.

My only concern with doing the fuse hook up is I’m bound to see some wire. I can run it behind the panel on the side of the dash that says airbag on it, then run it up the a pillar hidden by the black seal trim. But eventually it has to cross over and I’ll see that. Am I missing something? I don’t want to remove the a pillar. Thanks
You don't have to pull the A pillar trim you can use a plastic trim tool and tuck the wire behind it.

Mine is an OBDII tap and you see nothing, front and rear camera wires totally unseen.

I thought about mirror tap as well but it was suggested to me that with the new vehicles the CANBUS system is sensitive enough to sense a change in amperage. Yes it's not much, I think 3.7 is what the Thinkware draws but it might create a DTC. Plus mine is a lease and I can strip everything out in about 15-20 minutes and nobody knows it was there.
 

OP
S

st8

1000 Post Club
Messages
1,074
Reactions
479
Points
212
Location
Bel Air, MD, USA
Thread Starter #5
You don't have to pull the A pillar trim you can use a plastic trim tool and tuck the wire behind it.

Mine is an OBDII tap and you see nothing, front and rear camera wires totally unseen.

I thought about mirror tap as well but it was suggested to me that with the new vehicles the CANBUS system is sensitive enough to sense a change in amperage. Yes it's not much, I think 3.7 is what the Thinkware draws but it might create a DTC. Plus mine is a lease and I can strip everything out in about 15-20 minutes and nobody knows it was there.
Okay thank you.
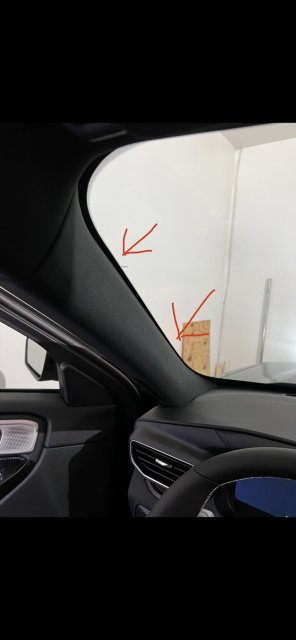
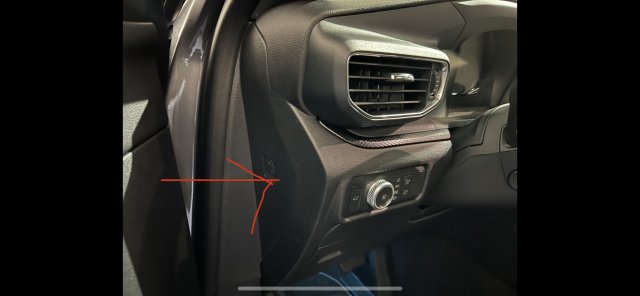
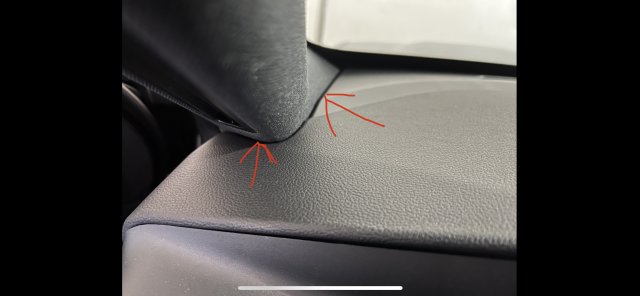
So question about running the wire. So in the second picture, is that where you ran your wire? Space right between the window and a pillar? There does seem to be enough space to tuck the wire.
Then the first picture, the arrow closest to the window, there seems to be space to tuck the wire. It’s where I put the red arrow below the air vent that I don’t think there’s enough room to tuck the wire. What did you do for that?
And then lastly like the OP did, you just removed that side panel with the airbag symbol on it right?
 

Attachments

Messages
99
Reactions
47
Points
17
Location
Washington D.C., DC, USA
#6
I looked at the mirror when I did mine, but the camera I bought actually has 2 hot leads, 1 on battery, and 1 on ignition, and uses either-or depending on what I want it to do. I ran it just like the pictures above and had plenty of options in the passenger compartment fuse box. Use a trim removal tool 100% of the time, you will not set off the airbag easily, you will know you are doing something wrong before that happens. Just be slow.
 

OP
S

st8

1000 Post Club
Messages
1,074
Reactions
479
Points
212
Location
Bel Air, MD, USA
Thread Starter #7
I looked at the mirror when I did mine, but the camera I bought actually has 2 hot leads, 1 on battery, and 1 on ignition, and uses either-or depending on what I want it to do. I ran it just like the pictures above and had plenty of options in the passenger compartment fuse box. Use a trim removal tool 100% of the time, you will not set off the airbag easily, you will know you are doing something wrong before that happens. Just be slow.
You removed the a pillar? I’m curious how how sgt did it. Seems like he didn’t remove the a pillar. It seems straightforward, I’m just not sure about that one section in my first pic, below the air vent. Barely any gap there to hide the wire.
 

Sgt1411

Member
Law Enforcement
Messages
239
Reactions
151
Points
37
Location
BC&AZ
Vehicle
2021 ST
#8
Okay thank you.
So question about running the wire. So in the second picture, is that where you ran your wire? Space right between the window and a pillar? There does seem to be enough space to tuck the wire.
Then the first picture, the arrow closest to the window, there seems to be space to tuck the wire. It’s where I put the red arrow below the air vent that I don’t think there’s enough room to tuck the wire. What did you do for that?
And then lastly like the OP did, you just removed that side panel with the airbag symbol on it right?

Your arrows are correct that's where I ran it and yes the "end cap" on the dash where the AirBag symbol is was the spot I went into the under dash area.

One of your pics shows arrows pointing to the gap at the base of the A pillar trim, I DID NOT use that path.

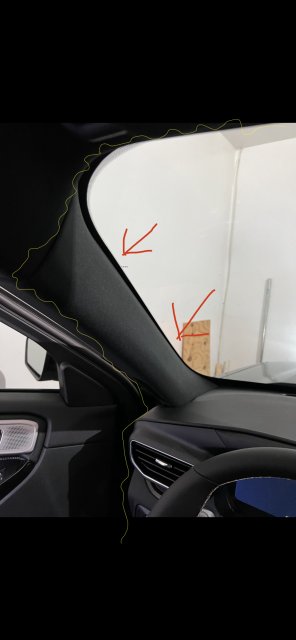
I went from RVM area at center of windshield along the lip of the headliner to the A pillar trim, around the A pillar trim (top) to the door opening trim. Pulled out that rubber trim and down the gap until you get to the split between the lower kick panel and the end cap your showing. I went into the under dash through there and into my OBDII connector.

Exact same install on another 2021 Escape

Ran the rear camera wire exact same way up to the B pillar then along drivers side B pillar molding and door opening rubber trim. Then at liftgate I pulled lift gate opening trim off and fished through the corrugated rubber tubing (boot) that Ford uses to protect the liftgate wiring.

Pro Tip: I used a large zap strap as my fish tape to get through the OEM Rubber tubing (boot), after 10 minutes of no success I sprayed the zap strap with a little silicone and it slid right through the corrugated boot. Then you pop off the hard trim piece on the liftgate interior above the window. I put a strain relief anchor on the wire and pulled through an extra foot of wire but thats for those of us with OCD problems, it's not needed. I found only way to aim rear camera was to get image on my phone then crawl in back area and have someone close liftgate. Again I have an OCD problem not everyone will do that.
 

OP
S

st8

1000 Post Club
Messages
1,074
Reactions
479
Points
212
Location
Bel Air, MD, USA
Thread Starter #9
Your arrows are correct that's where I ran it and yes the "end cap" on the dash where the AirBag symbol is was the spot I went into the under dash area.

One of your pics shows arrows pointing to the gap at the base of the A pillar trim, I DID NOT use that path.

I went from RVM area at center of windshield along the lip of the headliner to the A pillar trim, around the A pillar trim (top) to the door opening trim. Pulled out that rubber trim and down the gap until you get to the split between the lower kick panel and the end cap your showing. I went into the under dash through there and into my OBDII connector.

Exact same install on another 2021 Escape

Ran the rear camera wire exact same way up to the B pillar then along drivers side B pillar molding and door opening rubber trim. Then at liftgate I pulled lift gate opening trim off and fished through the corrugated rubber tubing (boot) that Ford uses to protect the liftgate wiring.

Pro Tip: I used a large zap strap as my fish tape to get through the OEM Rubber tubing (boot), after 10 minutes of no success I sprayed the zap strap with a little silicone and it slid right through the corrugated boot. Then you pop off the hard trim piece on the liftgate interior above the window. I put a strain relief anchor on the wire and pulled through an extra foot of wire but thats for those of us with OCD problems, it's not needed. I found only way to aim rear camera was to get image on my phone then crawl in back area and have someone close liftgate. Again I have an OCD problem not everyone will do that.
I appreciate the details. Only thing I’m unsure what you mean is the RVM area.
So once I run the wire down the a pillar in the gap between the a pillar and the window, what direction did you go if you didn’t go through the gap at the bottom of the a pillar below the vent? I don’t think there’s anyway to fish it down the dash.
 

Sgt1411

Member
Law Enforcement
Messages
239
Reactions
151
Points
37
Location
BC&AZ
Vehicle
2021 ST
#10
I appreciate the details. Only thing I’m unsure what you mean is the RVM area.
So once I run the wire down the a pillar in the gap between the a pillar and the window, what direction did you go if you didn’t go through the gap at the bottom of the a pillar below the vent? I don’t think there’s anyway to fish it down the dash.
4952F54B-7543-4A80-93CC-10F35D8E5CB2.jpeg 4952F54B-7543-4A80-93CC-10F35D8E5CB2.jpeg RVM= Rear View Mirror
 

Sgt1411

Member
Law Enforcement
Messages
239
Reactions
151
Points
37
Location
BC&AZ
Vehicle
2021 ST
#11
Poor drawing but it changed after I uploaded it.....follow yellow line as the path for the wire
 

OP
S

st8

1000 Post Club
Messages
1,074
Reactions
479
Points
212
Location
Bel Air, MD, USA
Thread Starter #12
Poor drawing but it changed after I uploaded it.....follow yellow line as the path for the wire
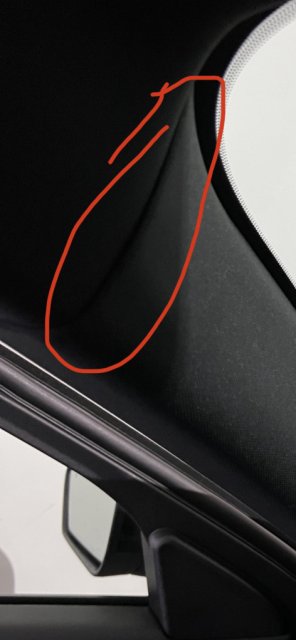
No, that’s very helpful! Did you just use a car trim pry tool to sneak the wire into the gap at the top of the a pillar? Circled area in my picture. That area is very tight and no way I could push the wire into it. I really don’t want to remove that piece. Just hate removing panels.
 

Attachments

Sgt1411

Member
Law Enforcement
Messages
239
Reactions
151
Points
37
Location
BC&AZ
Vehicle
2021 ST
#13
No, that’s very helpful! Did you just use a car trim pry tool to sneak the wire into the gap at the top of the a pillar? Circled area in my picture. That area is very tight and no way I could push the wire into it. I really don’t want to remove that piece. Just hate removing panels.
I used the plastic pry tool to pull A Pillar trim back 1/4" then used another pry tool to push wire down in there exactly


Top