• Sign Up! To view all forums and unlock additional cool features

    Welcome to the #1 Explorer ST Forum and Explorer ST community dedicated to Explorer ST owners and enthusiasts. Register for an account, it's free and it's easy, so don't hesitate to join the Explorer ST Forum today!


Trailer Brake Controller Plug Location, and Redarc Install

Draco-REX

New Member
Messages
21
Reactions
14
Points
2
Location
OH
Vehicle
2021 Explorer ST
#1
I installed a Redarc trailer brake controller the other day. And in researching, I found the explanations of where to find the plug in the car to be lacking (and ultimately incorrect). So I figured I'd make a post about it to help others in the future. I have a 2021 Explorer ST, I do not know if there are differences with other years.

The most common explanation of where to find the plug is "by your right knee" which was way off and would have led me to searching behind the center waterfall or by the column. I've also read that it was "taped to something" to hide it out of the way. I found both to be incorrect.

Finding the socket for the trailer brake control harness.

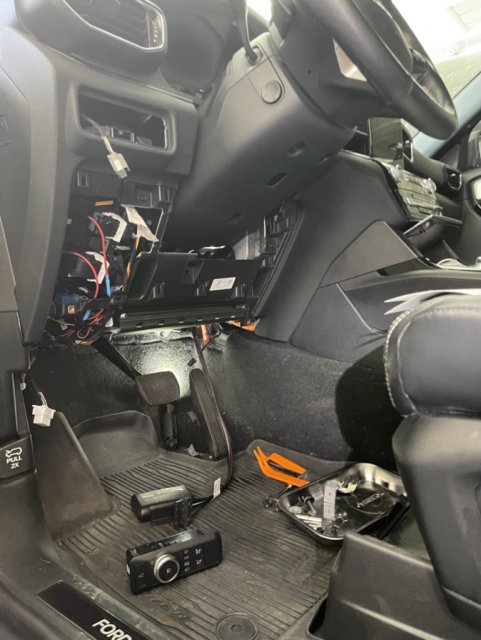
First step, remove the lower dash panel and the kick panel above the pedals. There is one visible 7mm bolt by the driver's knee, and another hidden behind the fuse panel cover. By the pedals there's a 10mm nut against the firewall and a 10mm bolt going towards the trans tunnel. Finally there's a christmas tree fastener right below where you removed the first bolt. Pop the lower dash panel free and work the kick panel out. There are two wires connected to the panels, one for a light above the pedals and the other for the OBD-II port.
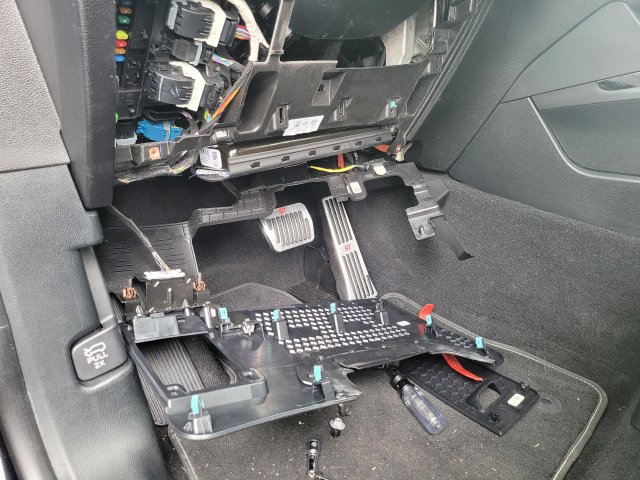
20230801_124146.jpg

Disconnect the plug for the lamp, and use a flat screwdriver to release one of the tabs holding the OBD-II port into the bracket and it'll pop right out. Put the panel aside.

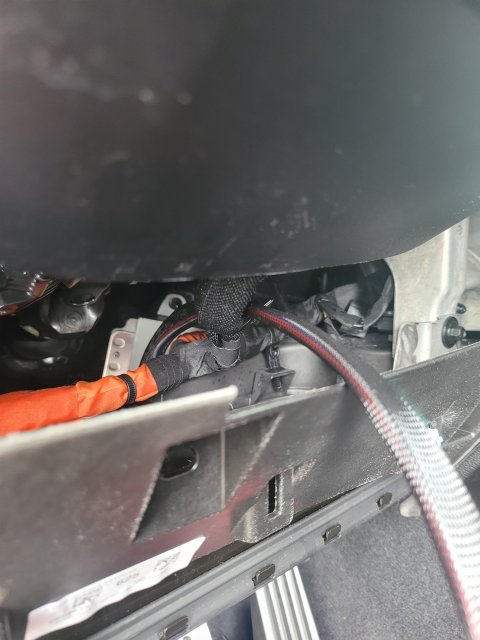
If you stick your head under there, or a mirror/camera, you'll find the plug for a trailer brake controller right above the brake pedal behind the knee air bag and floor vents.
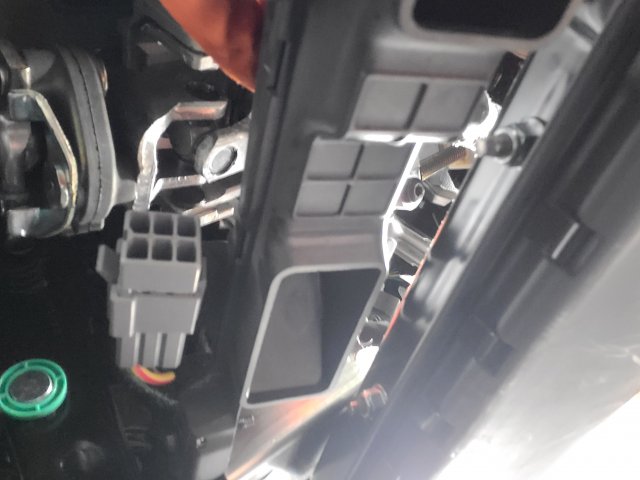
20230801_124223.jpg

It's the big grey plug in the picture. It's mounted to a cross bar there, you don't need to remove it. You'll also see that there's a dummy plug in the socket. Push back the angled tab you see and pull out the dummy plug.
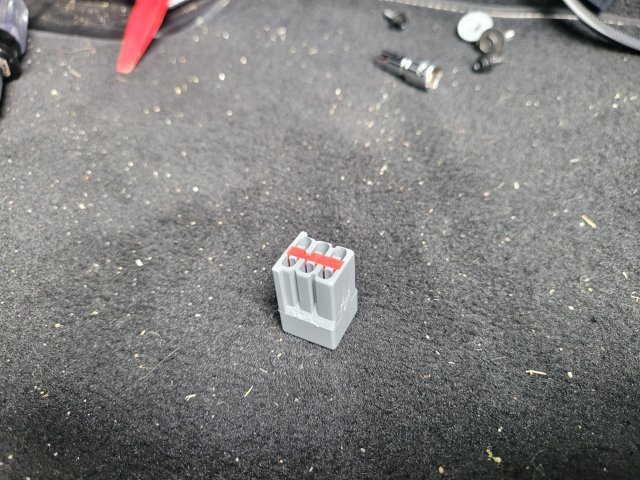
20230801_124928.jpg
The dummy plug.

Now you can plug in your trailer brake controller harness and proceed with the install.

Installing the Redarc Tow-Pro (Liberty or Elite).

I went with the Liberty over the Elite because I don't plan to tow off-road, and the Liberty still allows me to manually trigger moderate braking to reduce sway if needed. But both versions are identical dimensionally so this install will work with either.

Plugged in the harness:
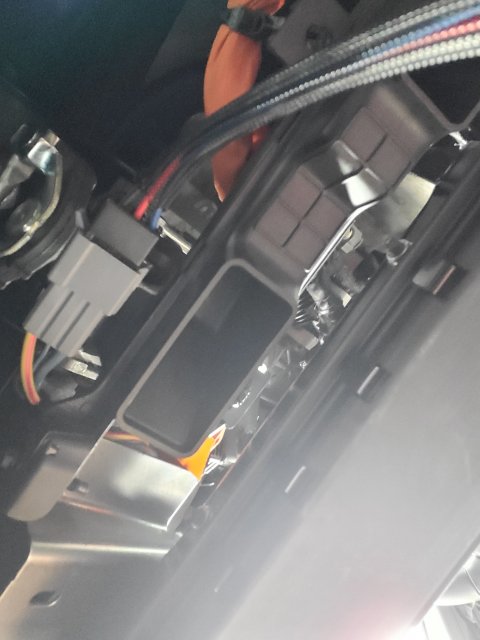
20230801_125034.jpg

Secured to the column harness:

20230801_125418.jpg

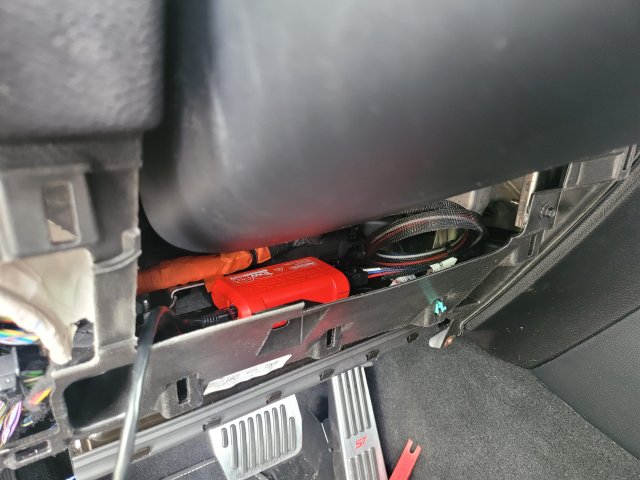
Then I coiled the excess, connected it to the Tow-Pro. I also connected the cable for the control knob and then mounted the Tow-Pro with 3M rivet tape to the top of the knee air bag. The bag expands from the bottom, so this won't interfere with deployment.
20230801_125851.jpg

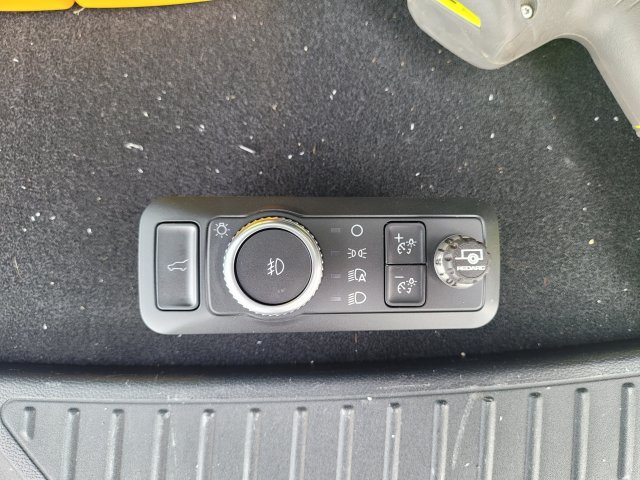
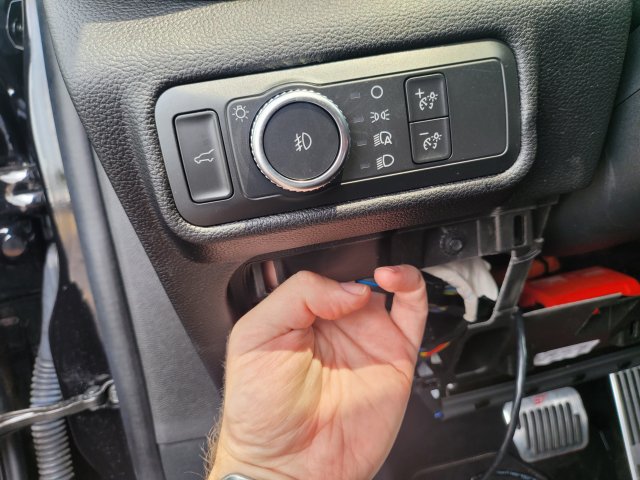
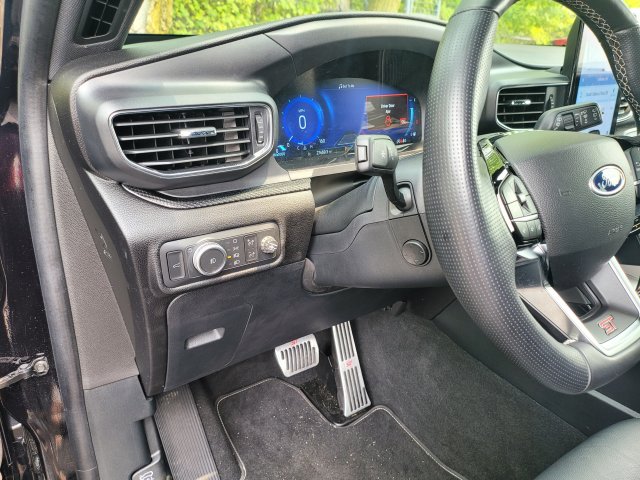
Now to mount the control knob. I got the idea of where to mount it from the Bronco forums. It looks like Ford offeres an accessory trailer brake controller for the Bronco that is just a rebranded Redarc Tow-Pro Elite. They mount the knob in with the headlight controls and it looks really good. So I decided to mount mine the same way.

First, pop-out the lighting controls. It's really easy, just stick your hand up behind it and a light push will pop the panel out.
20230801_125906.jpg

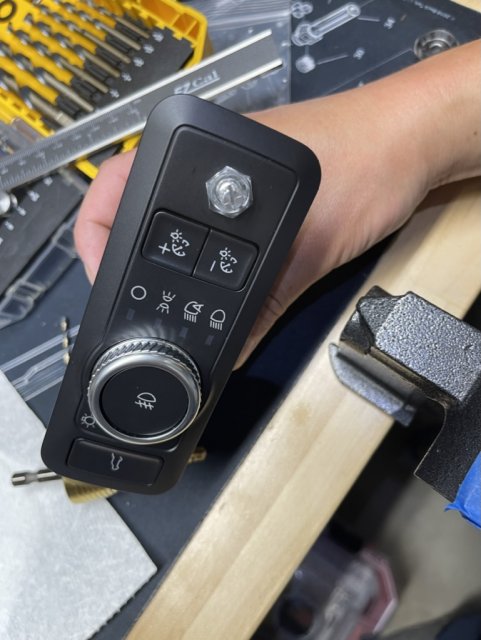
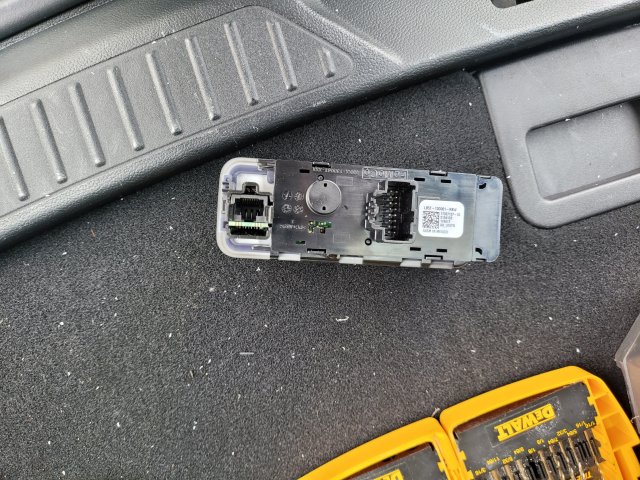
Now, at this point I thought I had pictures of the next stage, but I don't. Fortunately it's really easy to figure out. Unplug the switch assembly and look at the back. You'll see that there is room for the control knob to fit. Just mark and make your holes per the instructions and you'll end up with this:

Back side
20230801_131833.jpg

Front side

20230801_131820.jpg

And then put everything back together.

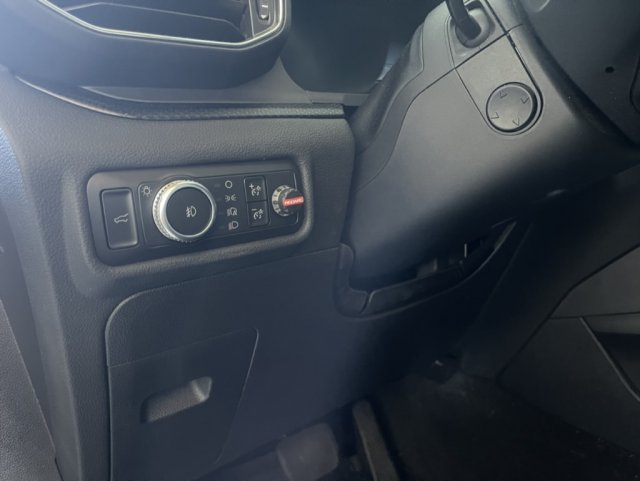
Finished product:
20230801_132727.jpg

I hope this helps someone in the future. It wasn't difficult to do and only took me about an hour or so.

Thanks for reading.
 

Dale5403

1000 Post Club
Messages
1,976
Reactions
1,990
Points
262
Location
Mondovi, WI, USA
#2
Nice write up.
 

Chamorro85

Active Member
Messages
524
Reactions
252
Points
52
Location
Round Lake, IL USA
Vehicle
'21 Explorer ST
#3
Amazing write up, thought I would need this and my BIL ended up using his truck. Always fun to take an opportunity to modify the ST! Thank you for this.
 

De_Stiller1948

New Member
U.S. Marine Veteran
Messages
7
Reactions
2
Points
1
Location
Tennessee
Vehicle
2023 Explorer ST
#4
I have removed the two screws and the two 10mm fasrners, the ones near the firewall and the transmission tunnel but can't get the panel off. I'm afraid to pull on it hard for fear of breaking it. Just how hard is it to pull it away from the plastic clips. I see no difference between your ST and my 23 St.
 

OP
D

Draco-REX

New Member
Messages
21
Reactions
14
Points
2
Location
OH
Vehicle
2021 Explorer ST
Thread Starter #5
I have removed the two screws and the two 10mm fasrners, the ones near the firewall and the transmission tunnel but can't get the panel off. I'm afraid to pull on it hard for fear of breaking it. Just how hard is it to pull it away from the plastic clips. I see no difference between your ST and my 23 St.
The panel takes a bit of force to pop free. Start at one of the upper corners and tug straight back towards the driver's seat, not downwards.
 

De_Stiller1948

New Member
U.S. Marine Veteran
Messages
7
Reactions
2
Points
1
Location
Tennessee
Vehicle
2023 Explorer ST
#6
Thank you sir, that worked like a charm. I was too " skert " as we hillbillies say, to pull on it. Now to find that dam plug. Why would Ford bury it in a mass of cables on a vehicle ordered with towing package. Have not found it yet but at least I'm making progress. Again, thank you for your assistance and for the post. I'm using the exact same controller as you did. Your installation looks great.
 

OP
D

Draco-REX

New Member
Messages
21
Reactions
14
Points
2
Location
OH
Vehicle
2021 Explorer ST
Thread Starter #7
Thank you sir, that worked like a charm. I was too " skert " as we hillbillies say, to pull on it. Now to find that dam plug. Why would Ford bury it in a mass of cables on a vehicle ordered with towing package. Have not found it yet but at least I'm making progress. Again, thank you for your assistance and for the post. I'm using the exact same controller as you did. Your installation looks great.
It wasn't buried at all on my car. Slide your hand under the knee air bag and you'll feel the plastic vents and right behind is the plug. My second picture is looking straight up from the floor mat. If you sit in the driver's seat and put your foot on the brake pedal, your toes are pointing straight at the plug.
 

De_Stiller1948

New Member
U.S. Marine Veteran
Messages
7
Reactions
2
Points
1
Location
Tennessee
Vehicle
2023 Explorer ST
#8
Found it my friend, exactly where your picture showed. Never got that inner piece of trim that fixes to the Trans tunnel and firewall off. That corner on the right end of the air bag just fought me until I gave up on removing it. I was able to pull it down enough to get the plug loose but not without sacrifice of some 76 year old skin and blood. Plugged my harness in and stopped for today to heal and try to get back on the good side of my Savior. Will hopefully finish tomorrow. Your post is spot on for installation of the Redarc controller for a 2023 Explorer ST. Thank you sir for the help.
 

OP
D

Draco-REX

New Member
Messages
21
Reactions
14
Points
2
Location
OH
Vehicle
2021 Explorer ST
Thread Starter #9
Found it my friend, exactly where your picture showed. Never got that inner piece of trim that fixes to the Trans tunnel and firewall off. That corner on the right end of the air bag just fought me until I gave up on removing it. I was able to pull it down enough to get the plug loose but not without sacrifice of some 76 year old skin and blood. Plugged my harness in and stopped for today to heal and try to get back on the good side of my Savior. Will hopefully finish tomorrow. Your post is spot on for installation of the Redarc controller for a 2023 Explorer ST. Thank you sir for the help.
No problem. I'm glad I could help. I'm sorry I don't have pictures of the switch install. But I found it easier to drill the large hole from the back so I could be sure the switch would fit, then the small hole from the front so I could be sure it was straight.
 

Messages
27
Reactions
5
Points
2
Location
Western ma.
Vehicle
2023 explorer ST
#10
Thank you thank you and big thanks! That made it almost easy !
 

Messages
35
Reactions
16
Points
2
Location
Texas Hill Country
Vehicle
2021 Carbonized Gray Explorer ST
#11
This was very helpful. Thanks for taking the time to write it up. I almost pulled the trigger on the same controller and was going to mount the knob exactly like you did. I decided to go with the more basic Curt TriFlex and just used doublesided tape to mount it to the lower dash. The controller can unclip from the mount and the plug is accessible so I can just remove it when I don't need it. Pretty easy install.
 

kimmonia

New Member
Messages
18
Reactions
8
Points
2
Location
Midwest
#12
Thanks for the write up! Inspired, I have the same controller for my jeep. Now I know where to put it for my ST
 

powerboatr

Active Member
U.S. Navy Veteran
Messages
570
Reactions
355
Points
82
Location
Texas
Vehicle
2023 Explorer ST
#13
I installed a Redarc trailer brake controller the other day. And in researching, I found the explanations of where to find the plug in the car to be lacking (and ultimately incorrect). So I figured I'd make a post about it to help others in the future. I have a 2021 Explorer ST, I do not know if there are differences with other years.

The most common explanation of where to find the plug is "by your right knee" which was way off and would have led me to searching behind the center waterfall or by the column. I've also read that it was "taped to something" to hide it out of the way. I found both to be incorrect.

Finding the socket for the trailer brake control harness.

First step, remove the lower dash panel and the kick panel above the pedals. There is one visible 7mm bolt by the driver's knee, and another hidden behind the fuse panel cover. By the pedals there's a 10mm nut against the firewall and a 10mm bolt going towards the trans tunnel. Finally there's a christmas tree fastener right below where you removed the first bolt. Pop the lower dash panel free and work the kick panel out. There are two wires connected to the panels, one for a light above the pedals and the other for the OBD-II port.

View attachment 18942

Disconnect the plug for the lamp, and use a flat screwdriver to release one of the tabs holding the OBD-II port into the bracket and it'll pop right out. Put the panel aside.

If you stick your head under there, or a mirror/camera, you'll find the plug for a trailer brake controller right above the brake pedal behind the knee air bag and floor vents.

View attachment 18943

It's the big grey plug in the picture. It's mounted to a cross bar there, you don't need to remove it. You'll also see that there's a dummy plug in the socket. Push back the angled tab you see and pull out the dummy plug.

View attachment 18944
The dummy plug.

Now you can plug in your trailer brake controller harness and proceed with the install.

Installing the Redarc Tow-Pro (Liberty or Elite).

I went with the Liberty over the Elite because I don't plan to tow off-road, and the Liberty still allows me to manually trigger moderate braking to reduce sway if needed. But both versions are identical dimensionally so this install will work with either.

Plugged in the harness:

View attachment 18945

Secured to the column harness:

View attachment 18946

Then I coiled the excess, connected it to the Tow-Pro. I also connected the cable for the control knob and then mounted the Tow-Pro with 3M rivet tape to the top of the knee air bag. The bag expands from the bottom, so this won't interfere with deployment.

View attachment 18947

Now to mount the control knob. I got the idea of where to mount it from the Bronco forums. It looks like Ford offeres an accessory trailer brake controller for the Bronco that is just a rebranded Redarc Tow-Pro Elite. They mount the knob in with the headlight controls and it looks really good. So I decided to mount mine the same way.

First, pop-out the lighting controls. It's really easy, just stick your hand up behind it and a light push will pop the panel out.

View attachment 18950

Now, at this point I thought I had pictures of the next stage, but I don't. Fortunately it's really easy to figure out. Unplug the switch assembly and look at the back. You'll see that there is room for the control knob to fit. Just mark and make your holes per the instructions and you'll end up with this:

Back side

View attachment 18951

Front side

View attachment 18952

And then put everything back together.

Finished product:

View attachment 18953

I hope this helps someone in the future. It wasn't difficult to do and only took me about an hour or so.

Thanks for reading.
excellent
you should post this on e trailer as a install pics
thank you
 

Pine59

New Member
Messages
1
Reactions
1
Points
1
Location
:Minnesota
Vehicle
2023 Ford Explorer
#14
Just a quick thank-you for your really helpful posting. Although I drive a 2023 Explorer XLT, this was really helpful, especially for finding my way around the dash panels and install. Without much experience it took me about 5 hours instead of 1, but was being super careful to prevent any permanent flaws in the dash. Install went great, looks great, thanks again.
 

kimmonia

New Member
Messages
18
Reactions
8
Points
2
Location
Midwest
#15
@Draco-REX ! Thanks again for the write up, your directions were spot on. Successfully installed on my ST the Redarc Elite Pro. To help others out, I'll add a few more photos and tips.
- First, for my 2021, there was an extra retainer clip holding the trim piece near the bolt toward the center transmission.
- It helps to move the steering column up as high as it will go
- make sure to buy the ford specific harness TPH-006 ahead of time...
- I hate the white spacer adhesive thing they provide to use as an index, just skip it
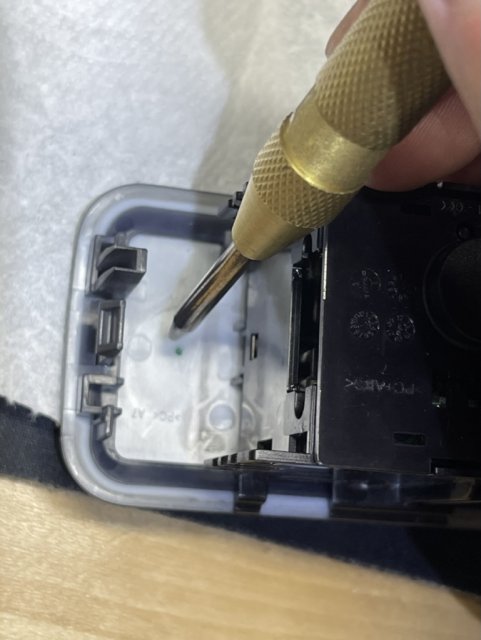
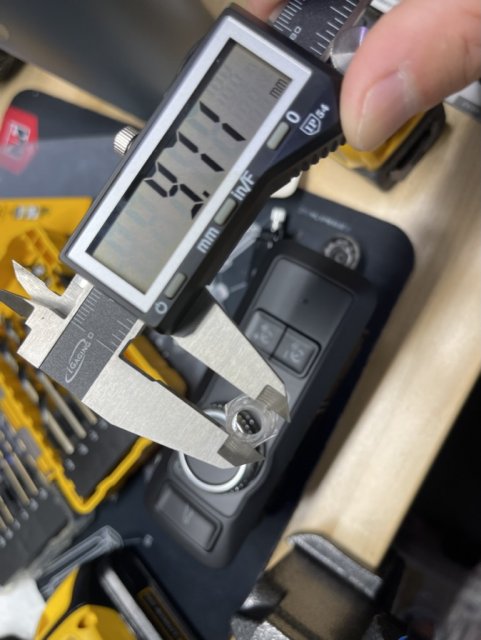
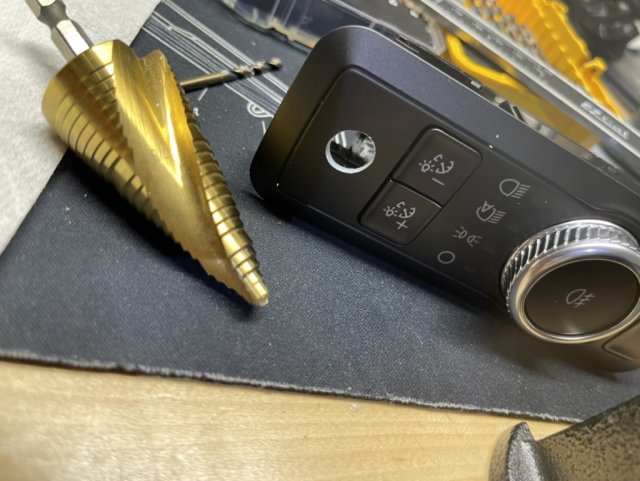
- If you're a normal guy and don't have a drillset in mm for the knob mount hole, see pic for exact dimension, I happened to have a step down drill bit.
- there is a green dot marking the center where the factory would have cut it on the back of the trim piece

E0F5A445-F82C-466D-B93F-63C17721971F_1_105_c.jpeg 33351D27-9EE2-49DB-81C7-A0F83890297C_1_105_c.jpeg 68224E56-F78C-4442-B986-30D8F71AB0E6_1_105_c.jpeg 059E61CD-6B18-4E6A-985F-9AB79F0E526A_1_105_c.jpeg 416C52B0-91B1-462C-9D64-7554A8E3D159_1_105_c.jpeg 056DD3A8-6794-4432-85CE-991099A95A09_1_105_c.jpeg
 

Messages
297
Reactions
176
Points
37
Location
San Francisco
Vehicle
2022 ST
#16
^ Very nice.
I have to say though, that I'm so retentive, that I would probably just buy a new/used trim piece so that when I drill and destroy it, I still have my pristine original one stored in the garage.
(Hooray resale value)
 

kimmonia

New Member
Messages
18
Reactions
8
Points
2
Location
Midwest
#17
^ Very nice.
I have to say though, that I'm so retentive, that I would probably just buy a new/used trim piece so that when I drill and destroy it, I still have my pristine original one stored in the garage.
(Hooray resale value)
Good point. I'm similar. I was more comfortable doing this because I saw the end result already and that I can easily order a replacement part if I screwed up.
 

Messages
6
Reactions
2
Points
2
Location
Auburn, WA
Vehicle
2022 Explorer ST
#18
Another BIG thanks for the instructions and pictures!! Took a couple hours. Would have been wayyyy longer without your guys' help.


Top